How To Download Web Server
The web server is one of the most important things to have if you want to build a website, or even just access a website remotely. There are many different types of web servers available, but in this article we will be focusing on Apache. We will also look at how to download and install it.
How To Download Web Server
There are a variety of reasons why developer or DevOps professionals locally install the Apache Web Server on a Windows 10 machine. They can use the Apache HTTP server for testing, or to simulate a production HTTP server that acts as static file cache for Apache Tomcat or Jetty. Maybe they simply want an internal web server for the office.
Fortunately, it’s relatively straightforward to install the Apache HTTP Server on Windows. However, you need to be aware of a few caveats.
Download Apache’s HTTP server
The first road-bump to install Apache on Windows is that you can’t download the installation binaries directly from apache.org. You must clone and compile the Apache HTTP Server source code yourself, or download the Apache 2.4 installation media from a third party.
A third-party download of the binaries is definitely the easiest way to go. The Apache website lists several approved options, including:
- Apache Lounge, which provides a single ZIP file you can quickly download and extract
- Apache Haus, which provides an Apache 2.4 install file that is packaged with OpenSSL
- The XAMPP distribution from the Apache Friends, who package Apache with MariaDB, PHP and Perl
- Bitnami, which provides pre-configured VMs, containers and installation media with Apache.
I’m a lifelong regular Bitnami user. I’d say the Bitnami stacks are the best installation media to use. (The WAMP stack with PHP, MySQL and Apache are highly recommended.)
The simplest approach, though, is to download the Apache Web Server installation ZIP file from the Apache Lounge. The website‘s spammy ads are a bit disconcerting, but the Apache download file is verifiable. Just don’t accidentally click on the wrong link and install some adware on your computer.
Step by step Apache install on Windows
If you choose the Apache Lounge as your source for the Apache on Windows installation media, the steps to follow are simple:
- Download the installation media in the form of a ZIP file
- Extract the contents of the Apache Web Server 2.4 zip to the file system
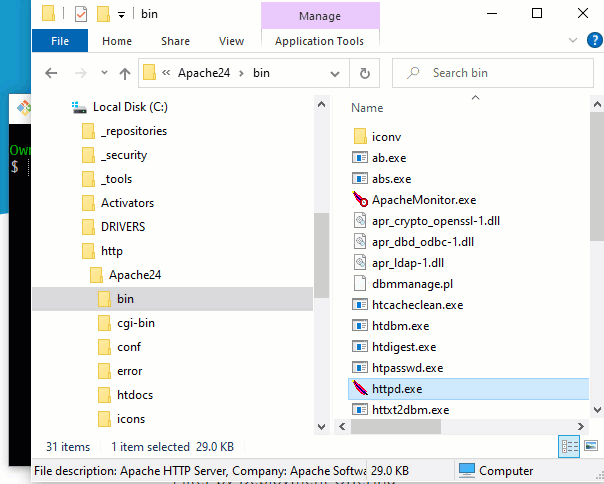
- Locate the extracted Apache24 folder and copy this folder to the root of C:\
- Open the C:\Apache24\bin folder and run the httpd.exe command
- View the Apache HTTP Server landing page at http://localhost:80 to verify the Windows install
When you point your browser to the localhost address, and there are no conflicts on port 80, a landing page will appear that says “It works!” To share files or host a website on the Apache server, simply add folders and files under the \htdocs folder. These files become immediately available over the web.
Avoid the ‘Apache ServerRoot must be a valid directory’ error
Somewhat surprisingly, the Bitnami and Apache Lounge installation media require you to install the software directly into the root of the Windows C:\ drive. Otherwise, you run into a “ServerRoot must be a valid directory” error. To remedy this Apache installation error, either move the Apache24 folder into the C:\ drive, or update the SRVROOT property defined on line 39 of Apache’s httpd.conf file.
Avoid ServerRoot errors when you install the Apache Web Server on Windows 10.
If you do run into this Apache ServerRoot Directory error with a Bitnami or XAMPP installation, run the configuration file found in the installation’s root or bin directly. The error will go away.
And that’s how easy it is to install the Apache HTTP Server on Windows 10.
how can i download all the email from my web server to outlook
If you are using email for work, you are most likely using an Exchange or IMAP account. Exchange and IMAP servers automatically archive your email so that you can access it anytime or anywhere. If you have an Exchange account, check with your admin about how to access your archived email.
If you want to back up the message folders locally (in addition to keeping them on the server), you can automatically move or delete older items with AutoArchive or export the items to a .pst file that you can restore later as needed and use by importing.
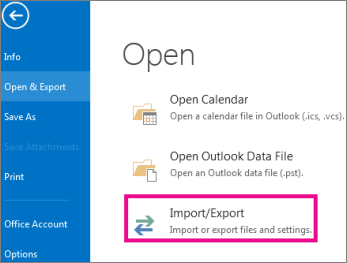
- Select File > Open & Export > Import/Export.
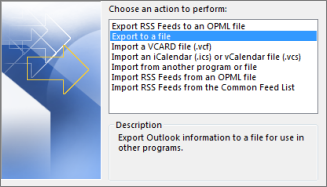
- Select Export to a file, and then select Next.
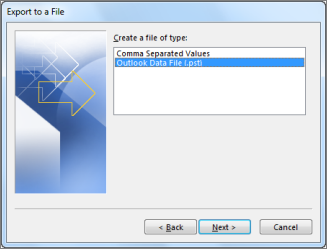
- Select Outlook Data File (.pst), and select Next.
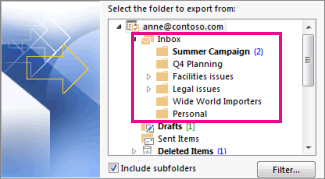
- Select the mail folder you want to back up and select Next.
- Choose a location and name for your backup file, and then select Finish.

- If you want to ensure no one has access to your files, enter and confirm a password, and then select OK.
The messages that you keep in a .pst file are no different from other messages. You can forward, reply, or search through the stored messages as you do with other messages.