The Ruby Plugin for NetBeans makes it easy to develop, debug and run Ruby programs. You can use all the standard NetBeans facilities, such as code completion, syntax coloring, auto-formatting and documentation, while keeping the flexibility of being able to write Ruby programs.
The Ruby plugin for NetBeans extends the IDE to provide Ruby language support and enables development of applications in Ruby language on Microsoft Windows, Linux and Mac OS X
The Ruby plugin comes with NetBeans and provides an easy to use but powerful user interface for writing and running Ruby code. The plugin provides syntax highlighting, code completion and error detection, as well as smart code navigation, a debugger and more.
ruby plugin for netbeans
If you do not have the NetBeans 6.0 IDE, go to the www.netbeans.org, and download a version of the IDE that contains Ruby support. If you have a NetBeans IDE 6.0 installation that does not include Ruby support, complete the following steps to add Ruby support to the IDE.
If your network uses a proxy, choose Tools > Options from the main menu, select the Manual Proxy Settings radio button in the Options dialog box, type the HTTP Proxy and Port for your proxy, and click OK.
Choose Tools > Plugins from the main menu.
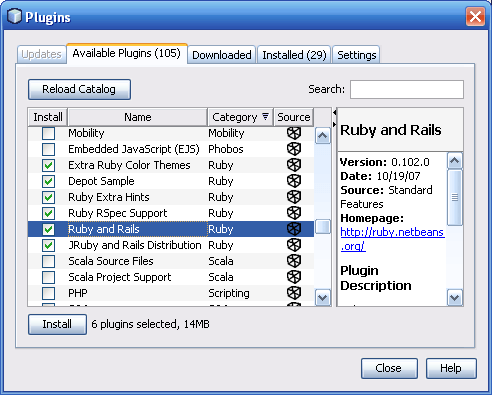
In the Plugins dialog box, click the Available Plugins tab, and scroll to the Ruby category, as shown below.
Figure 1: Plugin Manager
Plugin Manager
Select the Ruby and Rails checkbox to obtain Ruby support for the NetBeans IDE.
(Optional) Select the JRuby and Rails Distribution checkbox to download and install the JRuby software and the Ruby on Rails framework.
Note: You must have either Ruby or JRuby software installed on your system in order to use the Ruby and Rails distribution. If you do not have this software, you must either install this plugin, or download and install JRuby or Ruby software before working with Ruby projects in the IDE.
(Optional) Select one or more of the following plugins:
Extra Ruby Color Themes. Provides additional editor color themes for the Ruby file types.
Depot Sample. A Sample JRuby on Rails application.
Ruby Extra Hints. Provides additional code hints for Ruby, such as the detection of local variable name conflicts and the detection of variable names that do not follow Ruby coding conventions.
Ruby RSpec support. Provdes IDE support for the RSpec framework.
Click Install.
The NetBeans IDE Installer appears.
In the NetBeans IDE Installer, click Next.
Read the license agreement, then select the I Accept the Terms in All License Agreements radio button, and click Install.
After the installation is completed, select either Restart IDE Now or Restart IDE Later and click Finish.
Configuring the IDE to Use Your Own Ruby Installation (Optional)
The first time that you create or open a Ruby project in the IDE, the IDE checks if you have any other Ruby installations in addition to the bundled JRuby software. If you do, the IDE displays a dialog box asking you to select which software to use.
If you decide to install the Ruby software later, you can complete the following steps to configure the IDE to use your Ruby installation.
In the IDE, choose Tools > Options from the main menu.
Click Ruby, and, if necessary, click the Platform tab.
If you have not yet opened or created a Ruby project, the first time that you access the Platform tab, the IDE displays a Choose Ruby Interpreter dialog box. The dialog box shows a list of available Ruby installations, as shown in the following figure. If the dialog box does not appear, skip to Step 5.
Figure 2: Choose Ruby Interpreter Dialog Box
Choose Ruby Interpreter dialog box
Select the Ruby interpreter that you want to use. If you do not see your Ruby interpreter on the list, click Other.
Click Close.
If you chose Other in Step 3, or if the Choose Ruby Interpreter dialog box did not appear, click the Browse button as shown in the next figure. Navigate to the location of your Ruby binary and click Open.
Figure 3: Ruby Options Window
Screenshot of Ruby Options window
Note: You can also access the Ruby Options window by clicking the Change button in step 2 of the New Project wizard.
Click OK to close the Options dialog box.
For information about obtaining Ruby software, see www.ruby-lang.org, instantrails.rubyforge.org, and locomotive.raaum.org.
Managing Gems
Gems are third-party Ruby libraries. The IDE provides a Ruby Gems manager for adding and maintaining gems. You open the Ruby Gems manager by choosing Tools > Ruby Gems from the main menu. The manager contains the following tabs:
Updated. Lists which of your installed gems have a newer version available.
Installed. Displays a list of the gems that have been installed for the registered Ruby platform. See the previous section for information about registering the Ruby platform. If you are using the JRuby platform and the IDE includes the JRuby and Rails Distribution plugin, the list contains the ActiveRecord-JDBC gem and the Rails framework, as shown in the next figure.
New Gems. Lists the gems that you can add to your Ruby platform.
Settings. Use this tab to configure the proxy.
Figure 4: Installed Tab in Ruby Gems Manager
Installed tab in Ruby Gems manager
Note. The RubyGems wiki page provides information about how to enable the Ruby Gems manager to manage a native Ruby gems repository.
For more information about Ruby Gems, go to www.ruby-lang.org/en/libraries/. For more information about Rails, go to rubyonrails.org. Information about the ActiveRecord-JDBC gem can be found at jruby-extras.rubyforge.org/ActiveRecord-JDBC.
Using Database Servers With JRuby
You can access databases from a JRuby on Rails application in one of two ways.
MySQL Adapter. The MySQL adapter is included with JRuby. You use this adapter just as you would with a native Ruby on Rails application.
JDBC Adapter. As mentioned earlier, the JRuby and Rails Distribution plugin includes the ActiveRecord-JDBC gem, which enables your JRuby on Rails application to access database servers that provide JDBC 3.0 compliant drivers, such as MySQL, PostgreSQL, Oracle, HSQLDB, and Java DB (also known as Derby). The JDBC driver must be a pure Java driver. At the time of this writing, ActiveRecord-JDBC does not work with the Sqlite JDBC driver.
To use a JDBC connection, you must obtain a JDBC 3.0 client driver for your database server, and put a copy of the JDBC driver in the JRuby/lib folder. Depending on your installation, this folder can be in one of two places.
netbeans-install-dir/ruby1/jruby-1.0.2/lib
netbeans-user-dir/jruby-1.0.2/JRuby/lib
Note: The MySQL and PostgreSQL JDBC drivers are bundled with the IDE. If your installation includes the GlassFish application server, the Java DB driver is also available. To locate the drivers, expand Databases > Drivers in the Services window. Right-click the node for the driver, and choose Customize. A dialog box opens, which shows the location of the driver file.
To use the JDBC adapter in a Ruby on Rails project, select the Access Database Using JDBC checkbox when you create the project, as shown in the following figure.
Figure 5: Selecting JDBC Database Access
Selecting JDBC Database Access
When you select this checkbox, the IDE puts the following statements in the environment.rb file.
Code Sample 1: JDBC Environment Setup
if RUBY_PLATFORM =~ /java/
require ‘rubygems’
gem ‘ActiveRecord-JDBC’
require ‘jdbc_adapter’
end
When you use the JDBC adapter to access a database, you configure the database settings in the database.yml just as you would if you were using that database’s Rails adapter, as shown in the following code sample.
Code Sample 2: JDBC Database Configuration Example
adapter: mysql
database: my_development_database
username: fred
password: secret
host: localhost
When you create a Ruby on Rails project, the IDE adds the configurations to the database.yml for the database server that you select in step 2 of the Wizard as shown in Figure 5. If you are using a database server that is not in the drop-down list, you can edit the database configuration in the database.yml file after you create the project.
Note: If your operating system’s host file does not contain localhost, use 127.0.0.1 instead. Note also that with some systems, the database setting must be in lowercase letters.
Adding Databases
Several of the NetBeans tutorials require that you create a database for the data tables that are used by the tutorial. The steps for adding a database are different for each database server. The following instructions are for the MySQL and Java DB databases.
Adding MySQL Databases
If it has not already been started, start the database server.
(Optional) Use the following steps to create a user.
At a command prompt, type the following command.
mysql -u user -p
Omit the -p if the user does not have a password. Otherwise, when prompted, type the password. The user must have global create user privileges or the insert privilege for the mysql database, such as the root user.
Use syntax similar to the following example to create a user.
CREATE USER ‘fred’@’localhost’
identified by ‘secret’;
(Optional) Use syntax similar to the following to specify access privileges. In this example, the user is granted all privileges to all databases on the localhost database server.
GRANT ALL PRIVILEGES ON . TO ‘fred’@’localhost’;
Type quit and press Enter to exit.
To create a database, use syntax similar to the following at a command prompt.
mysqladmin -u fred -p create mydb_development
Omit the -p if the user does not have a password. Otherwise, when prompted, type the password. If you have not created users, you can use root as the user name.
For more information about creating MySQL users and databases, see the MySQL Reference Manual.
Adding Java DB (Derby) Databases
If you installed a version of the IDE that includes the GlassFish application server, the IDE is configured to access the Java DB database that is provided with GlassFish. You can use the following steps to add a Java DB database from the IDE.
From the main menu of the IDE, choose Tools > Java DB Database > Create Database.
In the Create Java DB Database dialog box, type the Database Name, User Name, and optional Password, as shown in the following example below.
Figure 6: Create Java DB Database Dialog Box
Create Java DB Database dialog box
(Optional) To specify a different location for the database, click Settings, then click the Browse button for the Database Location, navigate to the folder in which you want the database to reside, and click Open. Click OK to close the Java DB Settings dialog box.
Click OK.
The IDE creates the database and adds a node to the Databases section in the Services window, as shown in the next figure.
Figure 7: Database Node in Services Window
Database node in Services window
Registering Databases With the IDE
You do not need to register a database with the IDE to use it from your Ruby project. However, by registering a database you can create and view tables, and exercise SQL commands directly from the IDE.
Registering Database Servers With the IDE
First, you must register the database server with the IDE. The IDE has been tested with the following drivers:
Java DB 10.3.1.4
MySQL Connector/J 5.0.7
PostgreSQL 8.2 build 506
Oracle 10.2.0.3
MySQL, PostgreSQL, and, optionally, Java DB are already registered with the IDE. The following steps show how to register other database servers with the IDE.
If you haven’t already, obtain a JDBC 3.0 compliant driver for your database server.
In the next step, you specify the path to this driver. The IDE uses the JDBC driver to access the database schema and to query the databases. If the database client driver is not fully JDBC 3.0 compliant, you might have problems using the IDE’s database tools.
In the Services window, expand Databases, right-click the Drivers node and choose New Driver from the pop-up menu.
The New JDBC Driver dialog box appears.
Click Add, then navigate to and select the driver’s jar file, and click Open.
The New JDBC Driver dialog box displays the settings for the selected driver.
Click OK to close the New JDBC Driver dialog box.
The IDE adds a node for your database server under the Drivers node.
Establishing a Connection to a Database Instance
The following steps show how to create a connection from the IDE to a database instance, such as the example mydb_development database described in the previous section.
In the Services window, right-click the Databases node and choose New Connection.
The New Database Connection dialog box appears.
Select your driver from the Name drop-down list, such as MySQL (Connector/J driver).
Using the pattern shown in the Database URL text box as a guide, type the database’s URL into the text box. For example, type jdbc:mysql://localhost:3306/mydb_development.
Provide the user name, and provide the password if it is required, as shown in the next figure.
Figure 8: New Database Connection
Selecting JDBC Database Access
Click OK.
When the connection is established, click OK to dismiss the dialog box.
The IDE adds a node for the connection under the Databases node. The badge for the node shows that the connection is open. When you next start the IDE, the badge will be broken to indicate that the connection is closed. To reconnect, right-click the node and choose connect, provide your password if it is required, and click OK.
Deploying a JRuby Application to GlassFish
By default, your JRuby applications run in the WEBrick browser. If you want to deploy a JRuby application to the GlassFish application server, you can package the application and its dependencies in a web archive (WAR) file. Then you can make the WAR file available to the application server, as shown in the following steps.
The deployed application will use the production database. Open the database.yml file to ensure that the production configuration is set correctly.
When you create your JRuby application, you are given the option to add rake targets to support application server deployment, as shown in the following figure. If you intend to deploy to GlassFish, you should select this checkbox.
Figure 9: Option to Provide WAR Rake Targets
Option to Provide WAR Rake Targets
If you have an existing JRuby project that does not offer this rake target, complete the following steps to add the Goldspike plugin to the project. This plugin adds rake tasks that enable you to create WAR files.
In the Projects window, right-click the project’s node and choose Rails Plugins from the pop-up menu.
In the Rails Plugins dialog box, click the New Plugins tab.
If you do not see an entry for goldspike, complete the following steps to register the repository that provides the goldspike plugin.
Click the Repositories tab.
Click Add URL,
In the Add Repository URL dialog box, type http://jruby-extras.rubyforge.org/svn/trunk/rails-integration/plugins and click OK.
After the repository is added, click Close.
Click the New Plugins tab. You should now see an entry for goldspike.
Select the entry for goldspike, and click Install.
Click OK to start the installation.
Close both the Installation and the Rails Plugins dialog boxes.
Right-click the project’s node and choose Run Rake Task > Refresh List from the pop-up menu.
To package your application in a WAR file, right-click the project’s node and choose Run Rake Task > War > Standalone > Create.
The IDE creates the WAR file and puts the file in the project’s top folder.
If you are using the JDBC adapter, put a copy of your database server’s JDBC client driver in glassfish-install-dir/lib and start (or restart) the GlassFish server.
At the time of this writing, you must use the JDBC adapter unless you are connecting to a MySQL database.
Place a copy of the newly created WAR file into the GlassFish autodeploy folder. For example, copy projects-folder/MyRubyApp/MyRubyApp.war to glassfish-install-dir/domains/domain1/autodeploy.
In a browser, go to the URL for the application, for example, http://localhost:8080/MyRubyApp.